Printing Information
Adding a network printer in Mac, Linux and Windows requires the IP address of the printer.
List of Physics Printers
Non-bizhub printers (Save for the HP500 M551) are no-longer supported. Any non-BizHub printer are locally supported printers or legacy devices
| Room Number | Copier | IP Address |
|---|---|---|
| Riddick 149b | Konica Minolta Bizhub 360i (B&W) | 10.146.24.41 |
| Riddick 200 | Konica Minolta Bizhub 360i (B&W) | 10.146.24.104 |
| Riddick 258 | Konica Minolta Bizhub C360i (Color) | 10.146.24.96 |
| Riddick 400 | Konica Minolta Bizhub C360i (Color) | 10.146.24.47 |
| Riddick 419 | Konica Minolta Bizhub C360i (Color) | 10.146.24.11 |
| Riddick 421 | Konica Minolta Bizhub 360i (B&W) | 10.146.24.22 |
| Partners 2 (PII) | Konica Minolta Bizhub C360i (Color) | 10.146.33.5 |
| Partners 3 (PIII) | Konica Minolta Bizhub C360i (Color) | 10.146.32.68 |
Linux
In order to add a printer in Linux you will need sudo access. If you do not have sudo access, please email us so that we can assist. If you do have sudo access, follow these steps:
- You will need to download the proper PPD (Postscript Printer Description) file for the printer you’re installing: Download the color printer PPD file here or download the black and white printer PPD file here and save it to your Computer (for example, your Downloads folder).
- Open terminal and run the following command, but replace PRINTERNAME with a name for the printer you are adding and IPADDRESS with the IP Address of the printer you are adding (please make note of the IP address, as the menu automatically collapses). .
sudo /usr/sbin/lpadmin -p PRINTERNAME -E -v socket://IPADDRESS:9100 -P ~/Downloads/<name_of_PPD_file>.ppd
- To set this as your default printer, run the following command, replacing PRINTERNAME with the name you gave to the printer you just added
sudo /usr/sbin/lpadmin -d PRINTERNAME
Bizhub Printer for Windows
- Download the appropriate driver for your platform and printer here.
- Click on the Windows button on your start menu and navigate to the Control Panel
- Click on Hardware and Sound
- Click on Add a Printer, and then Add a local printer.
- Click the radio button for “Create a new port” and select “Standard TCP/IP Port”
- Type in the IP of the printer into the “Hostname or IP address” box
- On the driver screen select “Have Disk…”
- Go into the driver folder and choose the folder with your distribution of windows (x64=64-bit, x86=32-bit)
- Select the driver and hit next
- Right click on the now-added printer and click on “Printing Preferences”
- Click on “Authentication/Account Track…”
- Enter your pin and click verify
Other Printer for Windows
If you have administrative access on your Windows machine, you can add a printer by following these steps
- Click on the Windows button on your start menu and navigate to the Control Panel
- Click on Hardware and Sound
- Click on Add a Printer, and then Add a network printer.
- A dialogue box will pop up looking for printers, click on “The printer that I want isn’t listed”
- Click the radio button beside “Add a printer using a TCP/IP address or hostname” and click Next
- Enter the IP address of the printer and click next.
- If asked, let Windows find the driver or use the currently installed driver and click next
- Give the printer a name and click next
- You can print a test page. Click finish to complete the job.
Bizhub for Mac
- Download the latest drivers: https://www.konicaminolta.com/us-en/support/index.html
- Run the setup utility

- Open System Preferences and choose “Printers and Scanners”

- Click the “+” button to add a new printer
- Type in the IP of the printer and select “”Internet Printing Protocol- IPP” from the protocol drop down menu

- From the “Use:” drop down menu, choose “Select software”

- Scroll down and select the appropriate driver

- Click “Add” to add the printer
- On this screen, select the following options if available to you; otherwise, select “None”

- Click Ok
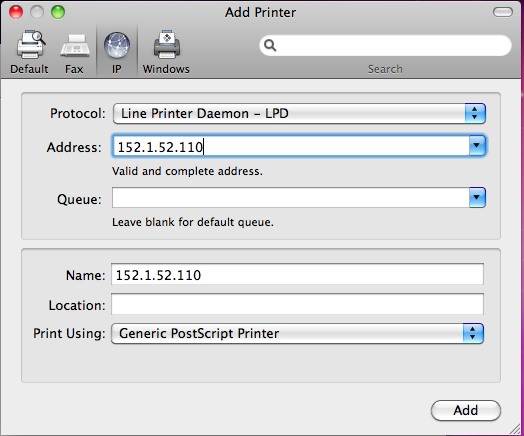
Other for Mac
- Open System Preferences from the Apple Menu
- Click on Print & Fax.

- Click on the + button on the left hand side of the window to add a new printer.
- Enter the IP address of the printer, leave all of the other options as their default selections.
- Click Add